Tuesday, July 12, 2011

Pudding Cake

I've had a busy day, I made lasagna in my crock pot, played around with my cricut and baked this delicious cake. A gal I work with gave me the recipe, and it is so yum-tastic.


And the best thing is you can mix it up all depending on the cake mix you use and the flavor of pudding you use.


It is so easy and oh soooo good.


Here's what you need...


1box cake mix (any flavor) I used white

1sm pkg instant pudding (I used coconut cream)

1c sour cream

1/2c water

1/3c oil


Mix well, batter will be thick so spread it around pan and shake in pan to remove all air bubbles, grease pan bake at 350' for 25 to 35 min (depending on what pan you use.


Pudding Frosting

1c milk

1sm pkg pudding (I used coconut cream)

8oz cool whip


Blend together spread over cooled cake and let cool so pudding will set up.


Hope you enjoy making different variations. My next cake will be Chocolate with banana cream pudding and strawberries. I think I'll call it Banana Chocolate Split Cake.


Let me know what you do.


I Did It


I dusted off my cricket machine and decided to realy start using it. I still have a lot to learn, but once I get it broke in and feeling like that old pair of sneakers...well I don't think I'll be able to leave it alone. :) This image was print and cut from Nursery Tails.


Every butterfly needs a little bling so I added small gems to the wings. Look at the dimension you get by adding pop dots and folding the wings up. I left the dragonfly flat which adds even more dimension to the popped butterflies. I Love the look of the printed sentiment and hope to see lots more sentiments on future cartridges.


Sunday, July 10, 2011

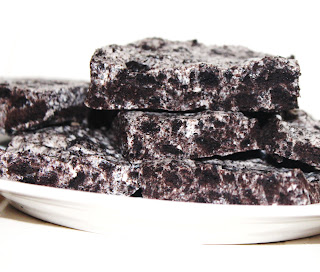
No Bake Cookie Bars

This is so yum-tastic. It's as easy as making rice krispie treats .
They did not last long in my house. That's how I know it's a good recipe.


Chewy No-Bake Cookies
1 (16-ounce) package of Oreo cookies
5 cups (1 bag) of large marshmallows
4 tablespoons butter
Line an 8x8-inch baking dish with aluminum foil, allowing the foil to hang over the edges, and set aside.
Place Oreo cookies in food processor (or crush in a large Ziploc bag with a rolling pin) and pulse until crumbly, but not ground.

Melt marshmallows and butter in a large microwave-safe bowl until puffy, about 1 1/2 to 2 minutes. Remove and pour in ground cookies. Quickly stir to combine, then transfer to baking dish.
Allow to set for 10 to 15 minutes. Remove bars from pan by foil edges. Cut, serve, and enjoy!


Source: Picky Palate

Tuesday, June 28, 2011

Shark Snack Attack

The kids saw this and wanted to try and make it so we attempted it.

It turned out pretty good


What I used..:
- 1 Watermelon (try to find one with more of an oval shape if you can)
- Blue Jell-O (2 large, 8-serving pkgs)
- Fish-Shaped Candies
- Blueberries (x2 for the eyes)
- Toothpicks (3 or 4)


Other Supplies I used, though all optional:
- Tray (I used a pizza pan)
- Foil
- Saran Wrap
- Blue & Green Markers
- Melon Ball Tool

Directions:
1) Prepare Your Ocean Water
I followed the recipe for Jell-O Jigglers, found HERE, ahead of time. I thought that having blue, Jell-O Jigglers would not only make a fun snack, but looks much more like water than the watermelon used in the original photo. Don't you think?

2) Prepare Your Tray
I covered a pizza pan with aluminum foil and had my children color the foil with blue and green markers. We then covered the colored foil tray with Saran Wrap so that the color would be protected. Remember that your shark will cover a good portion of your tray, so you don't have to completely color it.


3) Cut the Watermelon
Wait... first, let me recommend you wash your watermelon.
Now, lay your watermelon on it's side and decide which end would make a better shark head Slice off the other end at a slight angle (not too much).

Next, rest your watermelon on it's cut side, and decided where you would like the shark mouth. Make sure here that you are adding about an inch or so for the teeth you will be cutting out of the rind. Here, (Make sure to save your wedge for the shark fin!)

Next, with a small knife, carefully score around your shark mouth, only about 2-3 millimeters deep. This will help you to peal off the rind down to your cut so you can begin to form the teeth.

Again, with a small knife, carefully cut away the green rind down to your score lines around the mouth.

4) Remove the Good Stuff
... and SET IT ASIDE! We'll be using that in a bit.
I chose to use a melon baller here, but you may choose to take a knife and cut away all of the watermelon.

5) Cut the Teeth
But before you do that... I rinsed my shark once to get all the sticky off, and set it on some paper towels to help absorb the extra moisture.


6) Add Gills & Eyes
I used a small knife to cut into the rind (careful not to cut all the way through) to make an eye and the lines for the gills behind the mouth.

I broke a toothpick in half and used that to attach a blueberry to the center of each eye.

7) Add a Fin
Take the wedge you cut to form the shark mouth to make your fin. Below you will see how I cut my wedge to get a nice triangle fin.


Then I removed the watermelon from the other side. I placed the fin up to the shark and realized I needed to cut a bit of a curve on the bottom side to have it fit nicely. You may need to do the same.

To attach the fin, I placed a couple of toothpicks into the shark and pushed the fin into place.


8) Finishing Your Shark Attack Snack

Transfer your shark to your tray, if you haven't already.
Fill your shark mouth with your reserved watermelon chunks or melon balls.


Next, cut your Jell-O Jigglers into bit-sized pieces, and arrange them around your shark on the tray.

Finish it off by adding some candy fish to the shark's mouth and the ocean water around him. I didn't do this, but thought some whip cream would even be a fun touch. Messy, but fun. :)


And here's your finished snack.